
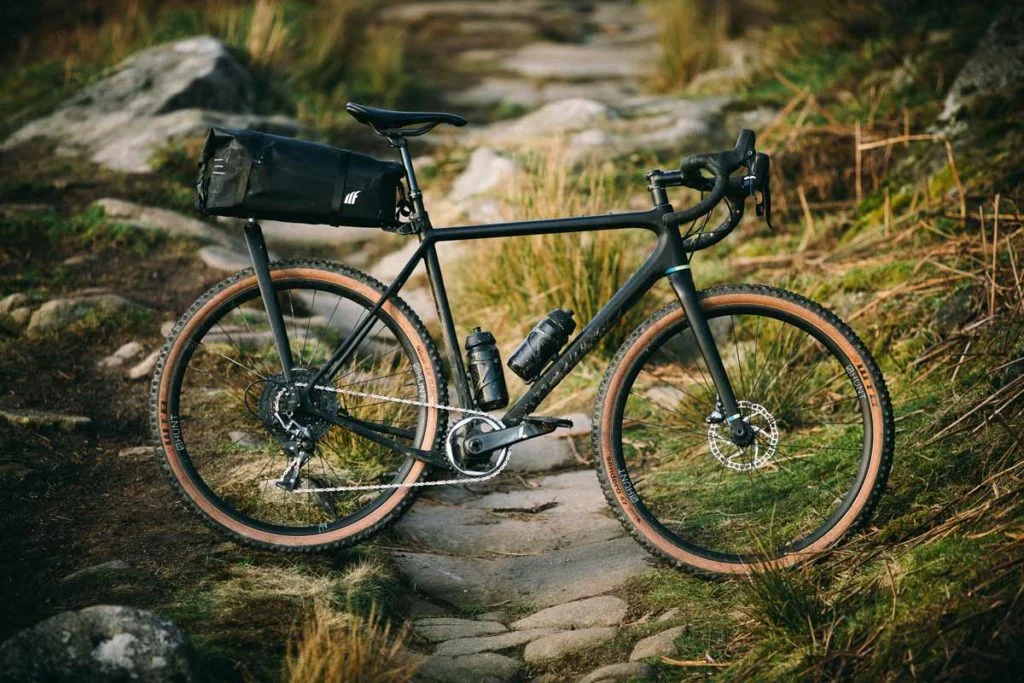
Embarking on the journey of building your own gravel bike is an exciting endeavor that promises a custom two-wheeled companion perfectly tailored to your riding preferences.
“How to build a gravel bike” is the guiding keyword for this adventure, and in this comprehensive guide, we’ll delve into the intricate world of gravel bike construction.
From selecting the right components to mastering the art of assembly, we’ll walk you through each step of the process, empowering you to craft a gravel bike that’s not just a mode of transport but an extension of your cycling passion.
So, let’s roll up our sleeves and begin this hands-on journey to building the ultimate gravel bike.
Read More: How to make a dirt jumper
Getting Started: Essentials and Planning
“Getting Started: Essentials and Planning” is the crucial first step in your journey to building a gravel bike. This section involves understanding the necessary components, tools, and planning considerations before diving into the actual build.
Read More: How to make your mountain bike faster
Here’s a detailed explanation:
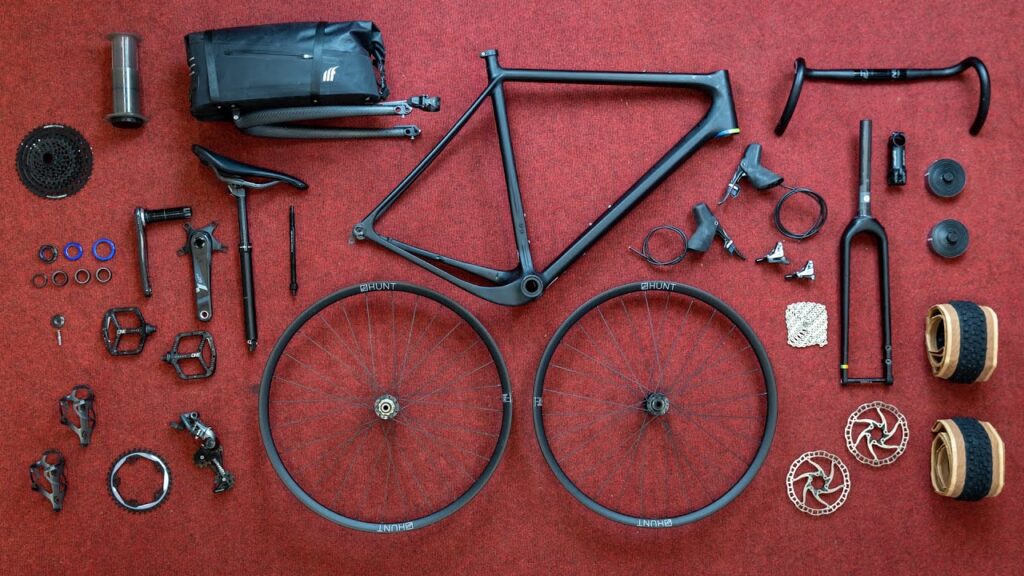
Components and Tools Overview:
Begin by familiarizing yourself with the essential components to build a gravel bike. This includes the frame, drivetrain (including gears and crankset), wheels, tires, brakes, handlebars, saddle, seat post, stem, and various small parts like cables, housing, and bolts.
Make a comprehensive list of the components you’ll need to purchase. Ensure compatibility between components, considering factors like frame specifications and wheel sizes.
Budget Planning:
Set a budget for your gravel bike project. Building a bike can be cost-effective compared to buying a pre-built one, but it’s important to allocate funds wisely to ensure you get the quality and performance you desire.
Frame Selection:
Decide on the type and size of frame that best suits your riding style and body dimensions. Gravel bike frames come in various materials (steel, aluminum, carbon fiber, etc.) and geometries, so consider factors like comfort, stability, and weight.
Tools and Workspace:
Gather the necessary tools for bike assembly, including wrenches, screwdrivers, cable cutters, a torque wrench, a bike stand, and specific tools for bottom bracket and headset installation. A clean and well-lit workspace is essential for a smooth build process.
Research and Learning:
Take time to research and educate yourself about the components you’ll be working with. Understanding how each part functions and interacts with the others will be invaluable during the build process.
Component Compatibility:
Ensure that all the components you select are compatible with your chosen frame. Pay attention to standards for bottom brackets, wheel axles, and brake types to avoid compatibility issues.
Sizing and Fit:
Consider your body measurements and riding preferences when selecting frame size, stem length, handlebar width, and saddle type. A well-fitted bike is essential for comfort and performance.
Safety Gear:
Don’t forget to invest in safety gear like gloves and safety glasses. These protect you during the assembly process, which can involve sharp components and tools.
Documentation and Manuals:
Keep instruction manuals for your components handy. These manuals provide essential information about installation, maintenance, and compatibility.
Project Timeline:
Plan a rough timeline for your bike build project. While it’s exciting, building a bike can be time-consuming, so allocate enough time to complete each step with care and precision.
By thoroughly preparing and planning in this initial phase, you’ll set a strong foundation for a successful gravel bike build.
This approach ensures that you have all the necessary components, tools, knowledge, and a clear roadmap to guide you through the construction process, resulting in a bike that’s tailored to your needs and riding style.
Choosing the Right Frame
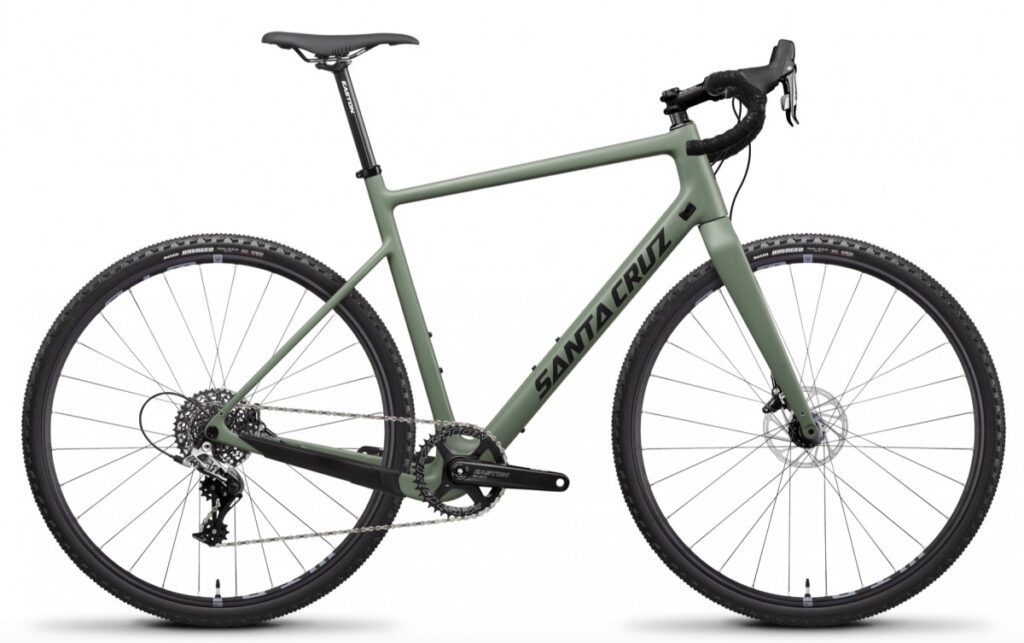
“Choosing the Right Frame” is a critical step in building your gravel bike as it serves as the foundation of your entire bicycle. The frame not only determines the bike’s overall appearance but also significantly influences its performance, comfort, and durability.
Read More: Can you put road tire on a mountain bike
Here’s a detailed explanation of this crucial decision:
Frame Materials:
Gravel bike frames are typically made from various materials, each with its unique characteristics:
Steel: Known for its durability and smooth ride quality, steel frames offer excellent comfort and are favored for long-distance riding.
Aluminum: Aluminum frames are lightweight and responsive, making them suitable for faster, more aggressive riding styles.
Carbon Fiber: Carbon frames are exceptionally lightweight and provide a balance between comfort and performance. They’re often chosen for racing and endurance riding.
Titanium: Titanium frames offer a combination of strength and low weight, making them an excellent choice for riders seeking a premium build.
Frame Geometry:
Consider the frame’s geometry, which includes measurements like the stack, reach, head tube angle, and seat tube angle. The frame’s geometry affects your riding position, stability, and handling.
Gravel bikes typically have more relaxed geometries than road bikes, providing a more upright riding position for comfort and stability on varied terrain.
Tire Clearance:
Check the frame’s tire clearance, as gravel bikes are designed to accommodate a range of tire sizes. Ensure the frame can fit the tire width you desire for your preferred riding conditions.
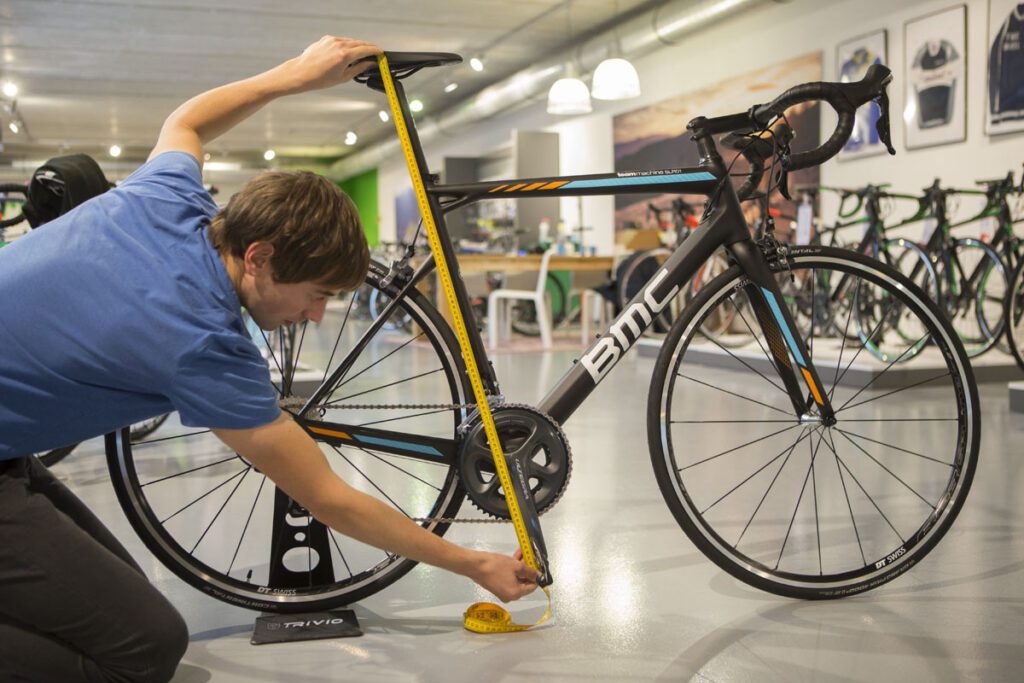
Frame Size:
Select the appropriate frame size based on your body measurements. A properly sized frame ensures comfort and efficient power transfer while pedaling.
Mounting Points:
Examine the frame for mounting points for accessories like water bottle cages, racks, and fenders. These can enhance the bike’s versatility for long rides or bike-packing adventures.
Suspension Compatibility:
Determine whether you want a rigid or suspension-compatible frame. Some gravel frames have the option to add front suspension forks for rougher off-road riding.
Frame Brand and Model:
Research frame brands and models to find reputable manufacturers known for their quality and craftsmanship. Read reviews and seek recommendations from experienced riders.
Budget Considerations:
Keep your budget in mind when choosing a frame. High-end materials like carbon fiber and titanium tend to be more expensive, while aluminum and steel can offer cost-effective alternatives.
Test Rides (if possible):
If possible, test ride bikes with different frame materials and geometries to get a feel for how they handle and their comfort levels.
Personal Riding Goals:
Finally, consider your personal riding goals. Are you focused on endurance, racing, bike-packing, or a mix of various terrains? Your intended use will guide your frame choice.
Choosing the right frame is a critical decision that directly impacts your riding experience. It’s important to strike a balance between material, geometry, size, and features to match your preferences and needs.
A well-chosen frame sets the stage for a comfortable and capable gravel bike that can tackle a wide range of adventures with confidence.
Building Your Dream Drivetrain: Gearing and Cranksets
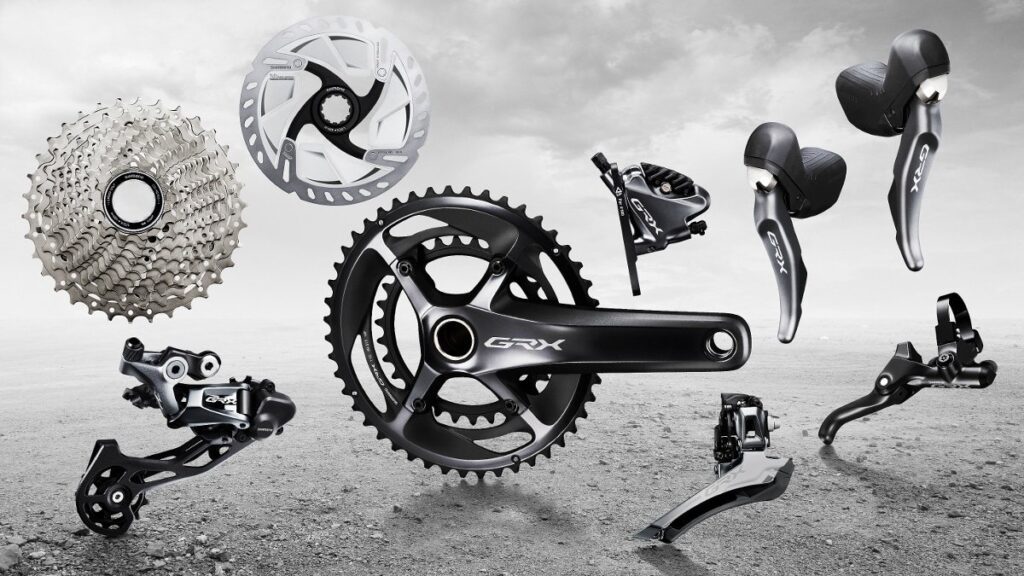
“Building Your Dream Drivetrain: Gearing and Cranksets” is a pivotal aspect of constructing your gravel bike, as the drivetrain components play a significant role in determining how the bike performs on various terrains and how efficiently it transfers your pedaling power.
Read More: How To Make A Gravel Bike More Comfortable
Here’s a detailed explanation of this crucial step:
Gearing Components:
The drivetrain includes various components responsible for transferring power from your pedals to the bike’s wheels. Key elements include:
Crankset: The crankset consists of one or more chainrings attached to the crank arms. The number of chainrings and their sizes significantly affect the bike’s gear range and versatility.
Chain: The chain connects the chainrings on the crankset to the cassette on the rear wheel. It’s a crucial component for transferring power efficiently.
Cassette: The cassette is a set of multiple gears (sprockets) mounted on the rear wheel hub. Different cassette sizes provide a range of gear ratios for various riding conditions.
Front and Rear Derailleurs: Derailleurs are responsible for moving the chain between the chainrings and cassette sprockets, allowing you to shift gears.
Shifters: Shifters, often integrated with the brake levers, control the derailleurs to change gears.
Gear Ratios:
Gravel bikes require a versatile range of gear ratios to handle both steep climbs and fast descents. Consider the terrain you’ll be riding on and choose gear ratios that match your intended use.
Compact cranksets (50/34T) and wide-range cassettes (11-42T or similar) are popular choices for gravel bikes, offering a good balance between climbing ability and speed.
Single vs. Double Chainrings:
Decide whether you want a single or double chainring setup. Single chainrings (1x) simplify the drivetrain, reducing complexity and weight, but may sacrifice some gear range.
Double chainrings (2x) provide a more comprehensive range of gear ratios but come with the added complexity of front derailleur shifting.
Chainring Sizes:
Choose chainring sizes that match your riding preferences. Smaller chainrings offer lower gears for climbing, while larger chainrings provide higher gears for speed on flat terrain.
Chainring Material:
Chainrings can be made from various materials, including aluminum, steel, or even carbon fiber. Material choice can affect durability and weight.
Compatibility:
Ensure that all your drivetrain components are compatible with each other. Check compatibility between the crankset, cassette, chain, and derailleurs to avoid issues during assembly.
Shifter Type:
Decide whether you want mechanical or electronic shifters. Automatic shifters are the traditional, cable-actuated type, while electronic shifters offer precise, effortless shifting but come at a higher cost.
Maintenance and Adjustments:
Be prepared to maintain and adjust your drivetrain regularly to keep it running smoothly. Regular cleaning, lubrication, and occasional adjustments are essential.
Professional Installation:
If you’re not confident in assembling and adjusting the drivetrain components, consider having them professionally installed to ensure proper functionality.
Choosing the right gearing and crankset configuration is vital for tailoring your gravel bike to your riding style and terrain. It’s a balance between climbing capability, speed on flat roads, and overall versatility.
A well-selected drivetrain ensures you’re equipped to tackle any gravel adventure with ease and efficiency.
Mastering Wheels and Tires
“Mastering Wheels and Tires” is a pivotal aspect of building your gravel bike as these components significantly impact your bike’s performance and versatility on different terrains.
Read More: Can you turn road bike into gravel bike
Here’s a detailed explanation of this important step:
Wheel Selection:
Gravel bike wheels come in various sizes and materials, and your choice can significantly affect your bike’s characteristics:
Size:
Gravel bike wheels are typically 700c, similar to road bikes, but some models accommodate 650b wheels. Each size has its benefits, with 700c offering speed and efficiency, while 650b provides more tire clearance and improved comfort on rough terrain.
Material:
Wheel materials include aluminum, carbon fiber, and even steel. Aluminum wheels are durable and cost-effective, while carbon wheels are lighter and offer better performance at a higher price point.
Depth:
Wheel depth can impact aerodynamics and stability. Shallower rims are more versatile, while deep-section rims can enhance aerodynamic performance.
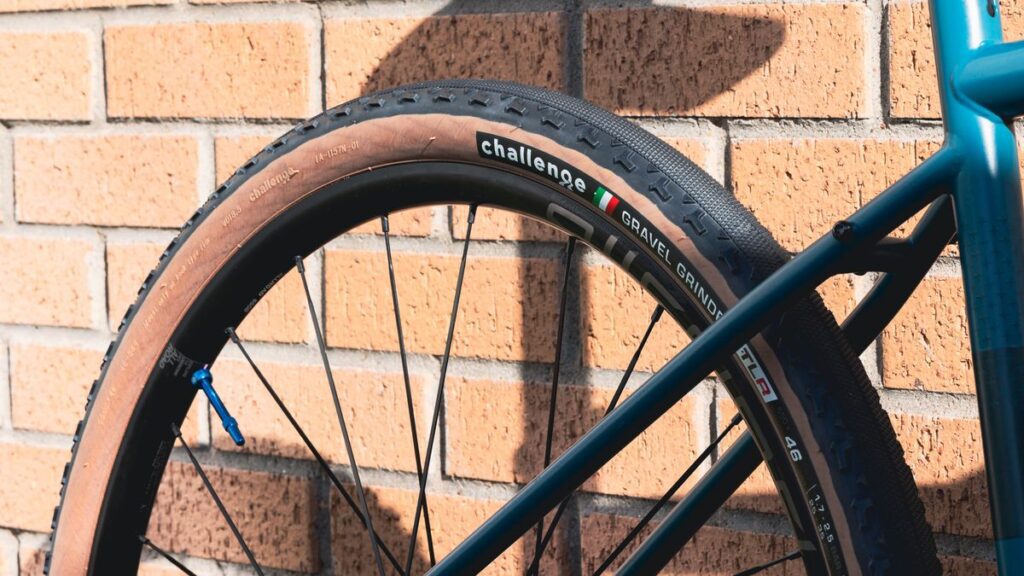
Tire Selection:
Gravel bike tires are available in a wide range of sizes and tread patterns, offering versatility for different riding conditions:
Tire Width:
Consider tire width, typically ranging from 28mm to 45mm or more. Wider tires provide more comfort and traction on rough terrain, while narrower tires offer less rolling resistance on smooth roads.
Tread Pattern:
Choose a tread pattern that suits your riding style and terrain. Knobby tires offer more grip off-road, while slick or semi-slick tires are ideal for smooth surfaces.
Tubeless vs. Tubed:
Decide whether you want tubeless or tubed tires. Tubeless tires offer lower rolling resistance, reduced risk of flats, and the ability to run lower pressures for improved traction.
Tire Pressure:
Proper tire pressure is critical for performance and comfort. The ideal pressure depends on your tire size, rider weight, and terrain. Experiment with different pressures to find the right balance between grip, comfort, and efficiency.
Wheelset Durability:
Consider the durability of your wheelset, especially if you plan on tackling rugged gravel routes. Sturdy wheels with strong spokes are essential for handling rough terrain.
Axle Standards:
Check the axle standards of your wheels to ensure compatibility with your frame and fork. Gravel bikes commonly use 12mm thru-axles for added stability and stiffness.
Tire Clearance:
Confirm that your frame and fork have sufficient tire clearance for the tire size you intend to use. Some gravel bikes can accommodate wider tires, providing more versatility.
Tubeless Setup:
If you opt for tubeless tires, learn the setup process, including sealing the tire and maintaining proper sealant levels. Tubeless systems reduce the risk of flats and allow you to run lower pressures for improved traction.
Terrain Considerations:
Choose your wheels and tires based on the type of terrain you’ll be riding. Smoother, flatter routes may favor narrower and slicker tires, while rough, technical terrain benefits from wider and knobbier options.
Personal Preferences:
Ultimately, your wheel and tire choices should align with your personal riding preferences, whether that’s prioritizing speed on smooth roads, comfort on rough gravel, or a balance between the two.
Mastering wheels and tires is crucial for tailoring your gravel bike to your intended riding conditions.
Whether you seek speed on pavement, adventure on gravel, or a mix of both, the right combination of wheels and tires can greatly enhance your bike’s performance and versatility.
Brakes and Control

“Brakes and Control” are critical components of your gravel bike that directly impact your safety, handling, and overall riding experience.
Here’s a detailed explanation of this important aspect of building your bike:
Brake Types:
Gravel bikes typically use two primary types of brakes: disc brakes and rim brakes.
Disc Brakes:
These are the most popular choice for gravel bikes due to their superior stopping power and consistent performance, especially in wet or muddy conditions. They come in two varieties: hydraulic disc brakes and mechanical disc brakes.
Rim Brakes:
Some older gravel bikes and certain models still come equipped with rim brakes. These brakes use pads that grip the wheel’s rims to slow down the bike. They are lighter but provide less stopping power than disc brakes, especially in adverse conditions.
Hydraulic vs. Mechanical Disc Brakes:
If you opt for disc brakes, you’ll need to decide between hydraulic and mechanical versions.
Hydraulic Disc Brakes:
These offer strong and consistent braking with excellent modulation (control over braking power). They are favored for their reliability and minimal maintenance but require specialized bleeding and servicing.
Mechanical Disc Brakes:
These are cable-actuated and offer decent braking performance with more straightforward maintenance. They are a good option if you prefer DIY servicing.
Brake Levers:
Brake levers come in various shapes and sizes, and it’s essential to choose ones that are comfortable and ergonomic for your hands. Many gravel bike brake levers also integrate shifting mechanisms for gear changes.
Tire Clearance and Fender Mounts:
Ensure that your gravel bike frame and fork provide adequate tire clearance for your chosen brake type and tire size. Additionally, check if the frame and fork have mounts for fenders, as this can affect your brake and tire choices.
Control and Handling:
Your choice of brakes directly impacts your control and handling of the bike. Disc brakes generally offer better modulation and stopping power, which can be crucial for precise control, especially in technical off-road terrain.
Brake Pads:
The type of brake pads you use can affect braking performance. For disc brakes, choose appropriate pads based on your riding conditions (e.g., organic for better initial bite, metallic for durability).
Maintenance:
Regularly inspect and maintain your brakes to ensure they’re in good working order. This includes checking brake pad wear, adjusting cable tension (for mechanical disc brakes), and bleeding hydraulic systems (if applicable).
Compatibility:
Confirm that your chosen brakes are compatible with your frame, fork, and wheelset. Different standards (e.g., post-mount or flat-mount) may require specific adapters or components.
Brake Setup:
Properly set up your brakes to ensure they engage smoothly and provide consistent performance. Caliper alignment, rotor truing, and cable tension are critical aspects of brake setup.
Test Rides:
After assembling your brakes, conduct test rides to ensure they respond as expected. Fine-tune adjustments as necessary for optimal control and safety.
Brakes and control are vital elements of your gravel bike that demand careful consideration.
Your choice of brake type, brake levers, and brake setup can significantly impact your ability to handle your bike confidently, especially on diverse terrain where precise control is essential for both safety and enjoyment.
Saddle Up: Choosing the Right Saddle and Seat post
“Saddle Up Choosing the Right Saddle and Seat post” is a crucial step in building your gravel bike because these components directly impact your comfort, riding posture, and overall cycling experience.
Here’s a detailed explanation of this important aspect:
Saddle Selection:
Your saddle is one of the most critical components for comfort during long rides. Consider the following factors when choosing the right saddle:
Width:
Saddles come in various widths to accommodate different sit bone spacing. It’s essential to measure your sit bone width to select a saddle that fits your anatomy.
Shape:
Saddles have different shapes, including flat, curved, and semi-curved profiles. Choose one that matches your riding style and flexibility.
Padding:
Saddles vary in the amount of padding they offer. More padding isn’t always better; it depends on your personal preference and the terrain you’ll be riding.
Cutouts:
Some saddles have central cutouts or relief channels to reduce pressure on sensitive areas. This can be especially beneficial for long rides.
Seat post Material:
Seat posts are commonly made from aluminum or carbon fiber. Carbon fiber seat posts tend to absorb vibrations better, offering a smoother ride, while aluminum seat posts are durable and cost-effective.
Seat post Diameter:
Ensure that the seat post diameter matches your frame’s seat tube diameter. Most gravel bikes use common seatpost sizes, but it’s essential to confirm compatibility.
Seat post Offset:
Seat posts can have varying amounts of offset, which determines how far forward or backward your saddle can be positioned. Choose an offset that allows you to achieve your preferred riding position.
Seat post Length and Adjustability:
Some seat posts offer additional adjustability features like setback and height adjustment. These can be valuable for fine-tuning your riding position for comfort and efficiency.
Suspension Seat posts:
If you anticipate riding on particularly rough terrain, you may consider a suspension seat post. These posts provide extra cushioning to absorb shocks and vibrations, enhancing comfort.
Test Rides:
It’s highly recommended to test different saddles and seat posts to find the combination that suits your body and riding style best. Many bike shops offer saddle test programs, allowing you to try before you buy.
Riding Position:
Your saddle height, angle, and fore-aft position significantly influence your riding posture and comfort. Experiment with adjustments to find the position that minimizes discomfort and maximizes efficiency.
Personal Preferences:
Keep in mind that saddle comfort is highly personal. What works for one rider may not work for another. Trust your comfort and preference when selecting a saddle and seat post.
Maintenance:
Regularly inspect your saddle and seat post for signs of wear, damage, or loosening. Proper maintenance ensures that these components continue to provide comfort and support.
Choosing the right saddle and seat post is essential for long-term riding comfort and performance on your gravel bike.
A well-fitted saddle that matches your anatomy and riding style, combined with an appropriately sized and adjustable seat post, can significantly enhance your cycling experience and reduce the risk of discomfort and injury on extended rides.
Handlebar and Stem Selection
“Handlebar and Stem Selection” is a significant aspect of building your gravel bike as it directly impacts your riding position, control, and overall comfort.
Here’s a detailed explanation of this crucial step:
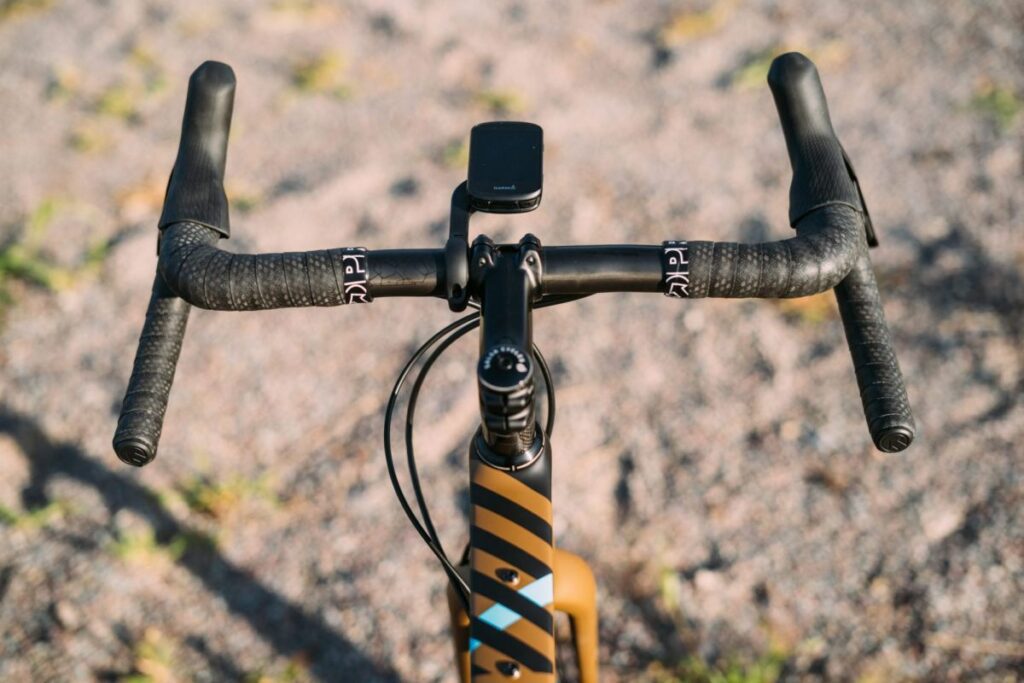
Handlebar Types:
Gravel bikes offer various handlebar types, and your choice should align with your riding style and comfort preferences:
Drop Bars:
These are similar to road bike handlebars and provide multiple hand positions for different riding conditions. Drop bars offer an aerodynamic riding posture and are favored for long-distance riding.
Flared Drop Bars:
These handlebars have drops that flare outward from the center. They provide additional control and stability on technical descents and rough terrain.
Flat Bars:
Flat handlebars are similar to those found on mountain bikes. They offer an upright riding position, which can be more comfortable and provide better control on technical trails.
Aero Bars:
Aero bars are extensions that allow a more aerodynamic riding position, ideal for time trials and triathlons. They are less common on gravel bikes but can be added for specific uses.
Handlebar Width:
Handlebar width should match your shoulder width for optimal control and comfort. Wider handlebars provide better stability on rough terrain, while narrower bars offer aerodynamic advantages.
Handlebar Material:
Handlebars are commonly made from aluminum or carbon fiber. Carbon handlebars can dampen vibrations for a smoother ride but come at a higher cost.
Stem Length:
The stem connects the handlebars to the fork and affects your reach and riding position. Choose a stem length that complements your desired riding posture and comfort.
Longer stems provide a more stretched-out, aerodynamic position, while shorter stems result in a more upright and relaxed riding posture.
Stem Angle:
Stem angle also impacts your riding position. Stems come in various angles (e.g., +/- 6 degrees). The angle determines how high or low your handlebars are positioned.
Handlebar Tape or Grips:
For drop bars, handlebar tape provides grip and comfort. Consider the material and thickness of the tape for a comfortable handhold.
Flat bars typically use grips, which vary in design and material. Ergonomic grips can reduce hand fatigue on long rides.
Brake and Shifter Integration:
Ensure that your handlebar choice is compatible with your brake and shifter setup. Some handlebars have specific shapes and diameters for integrated brake and shifter levers.
Test Rides and Adjustments:
After installation, perform test rides to fine-tune your handlebar and stem setup. Adjustments to stem height, angle, and handlebar position can greatly affect comfort and control.
Personal Preferences:
Handlebar and stem selection are highly personal. Your choice should align with your riding goals, terrain, and comfort preferences. What works for one rider may not work for another.
Handlebar and stem selection are integral to your gravel bike’s fit and control.
Your choice should promote a comfortable and efficient riding posture, allowing you to handle various terrains with confidence and reduce the risk of discomfort and fatigue during long rides.
Assembly and Tuning: Bringing Your Gravel Bike to Life

“Assembly and Tuning: Bringing Your Gravel Bike to Life” is the culmination of your gravel bike-building journey.
This phase involves carefully putting together all the components you’ve chosen and ensuring that your bike is not only functional but also fine-tuned for optimal performance and safety.
Here’s a detailed explanation of this important step:
Gather Your Tools:
Before starting assembly, ensure you have all the necessary tools, including wrenches, screwdrivers, torque wrenches, cable cutters, and any specific tools required for your components. A bike stand or work stand is also invaluable for stability and accessibility.
Frame Preparation:
Start with the frame, ensuring it’s clean and free from any dirt or debris. Install the necessary frame components, including the bottom bracket, headset, and seat post.
Drivetrain Assembly:
Begin assembling the drivetrain by attaching the crankset and bottom bracket. Install the chain and thread it through the derailleur(s) following the manufacturer’s instructions. Adjust the front and rear derailleurs for smooth shifting.
Wheels and Tires:
Mount your chosen wheels and tires on the bike, ensuring that they’re properly seated and aligned. Pay attention to tire direction and tire pressure, making sure they match your riding conditions.
Brake Setup:
Install and adjust the brakes, whether you’re using disc or rim brakes. Ensure the brakes engage evenly and that the brake pads contact the braking surface correctly. Test the brake lever reach and adjust as needed.
Handlebar and Stem:
Attach the handlebar and stem to the fork’s steerer tube. Adjust the stem angle and height to achieve your desired riding position. Tighten all bolts to the recommended torque values.
Shifting and Cabling:
Install the shifters and cables, whether you have mechanical or electronic shifting. Ensure that cables are routed correctly, and shift through all gears to verify smooth operation.
Saddle and Seat post:
Mount the saddle onto the seat post and adjust the seat post’s height and angle according to your preferences. Ensure that the saddle is securely attached.
Final Checks:
Before your first ride, perform a thorough safety check. This includes inspecting all bolts and fasteners for proper tightness, ensuring wheel quick releases or thru-axles are secure, and checking that the headset is properly adjusted.
Test Rides:
Conduct several test rides to fine-tune your bike’s setup. Pay attention to how it handles, shifts, and brakes. Make adjustments as necessary to achieve the desired comfort, control, and performance.
Safety Gear:
Don’t forget to equip your bike with safety gear such as lights, reflectors, and a bell or horn if required by local regulations.
Regular Maintenance:
Your bike will require ongoing maintenance to keep it in peak condition. Establish a maintenance schedule for tasks like cleaning, lubricating, and replacing components as needed.
Professional Assistance:
If you’re uncertain about any aspect of the assembly or tuning process, consider seeking assistance from a professional bike mechanic to ensure your bike is safe and optimized for performance.
The assembly and tuning phase is where your gravel bike truly comes to life. Taking the time to assemble your bike carefully and fine-tune its components ensures a safe, comfortable, and enjoyable riding experience.
With proper assembly and maintenance, your custom-built gravel bike can provide many miles of adventure and exploration.
Safety Checks and Test Rides

“Safety Checks and Test Rides” are crucial steps after assembling your gravel bike to ensure that it’s safe, functional, and ready for riding.
Here’s a detailed explanation of this important phase:
Bolt and Fastener Check:
Begin by inspecting all bolts and fasteners on your bike. Ensure that they are properly tightened to the manufacturer’s recommended torque values. Pay close attention to critical components like the stem, handlebars, saddle, seat post, and brake calipers.
Wheel Inspection:
Examine your wheels carefully. Check for any loose spokes, damaged rims, or visible irregularities. Spin the wheels to ensure they’re true, meaning they don’t wobble from side to side.
Tire Pressure:
Verify that your tires are inflated to the recommended pressure. Proper tire pressure is crucial for both performance and safety. It affects traction, comfort, and the risk of pinch flats.
Brake Functionality:
Test your brakes to ensure they engage smoothly and provide sufficient stopping power. Confirm that brake pads contact the braking surface evenly and that there are no unusual noises or vibrations when braking.
Shifting and Drivetrain:
Shift through all gears to ensure smooth and accurate shifting. Make any necessary adjustments to the front and rear derailleurs if you encounter issues. Verify that the chain runs smoothly and doesn’t rub against the front derailleur or other parts.
Headset and Fork:
Check the headset for play or looseness. The fork should turn smoothly without any grinding or resistance. Adjust the headset if needed to eliminate play.
Handlebar Alignment:
Confirm that the handlebars are properly aligned with the front wheel and fork. They should be centered and straight.
Brake Lever Reach:
Adjust the brake lever reach if necessary to ensure that you can comfortably and firmly reach the brake levers while riding.
Saddle Position:
Double-check the saddle’s height, angle, and fore-aft position. These adjustments greatly influence your riding comfort and efficiency.
Test Ride in a Controlled Environment:
Take your bike for a test ride in a safe and controlled environment, such as an empty parking lot or a quiet street. During the test ride, pay attention to how the bike handles, shifts, and brakes.
Brake Performance:
Gradually apply both front and rear brakes to gauge their performance. Ensure that they provide adequate stopping power without skidding the wheels.
Shifting Accuracy:
Shift through all gears while riding to verify that the drivetrain operates smoothly and consistently.
Steering and Handling:
Test the bike’s steering and handling characteristics. Ensure that it responds predictably to your input and feels stable.
Comfort and Fit:
Assess your riding comfort and fit on the bike. Make any necessary adjustments to achieve your desired riding position and comfort level.
Post-Ride Check:
After the test ride, perform another visual inspection of the bike to check for any signs of wear, loosening, or issues that may have arisen during the ride.
Fine-Tuning:
Based on your test ride experience, make any final adjustments or fine-tuning to ensure that your bike is perfectly dialed in for your riding style and preferences.
Maintenance Routine:
Establish a regular maintenance routine to keep your bike in excellent condition. Regularly check and maintain critical components, such as the drivetrain, brakes, and tires, to prolong their lifespan and ensure safe riding.
Professional Assessment:
If you encounter any issues or are uncertain about the condition of your bike, consider having it assessed by a professional bike mechanic to address any potential safety concerns.
Completing safety checks and test rides is essential to ensure that your gravel bike is safe, functional, and enjoyable to ride.
These steps help identify and address any potential issues, allowing you to confidently embark on your gravel adventures while minimizing the risk of accidents or mechanical failures.
The Joy of Gravel Riding: Exploring New Horizons
“The Joy of Gravel Riding: Exploring New Horizons” encapsulates the essence of gravel riding, offering a unique and rewarding cycling experience that combines adventure, exploration, and a connection with nature.
Here’s a detailed explanation of this exhilarating aspect of gravel riding:
Adventure Awaits:
Gravel riding is an invitation to explore the less-traveled paths and roads. Unlike road cycling, where the focus is often on speed and distance, gravel riding embraces the journey itself.
It encourages riders to venture into uncharted territory, discovering new routes, and landscapes, and hidden gems along the way.
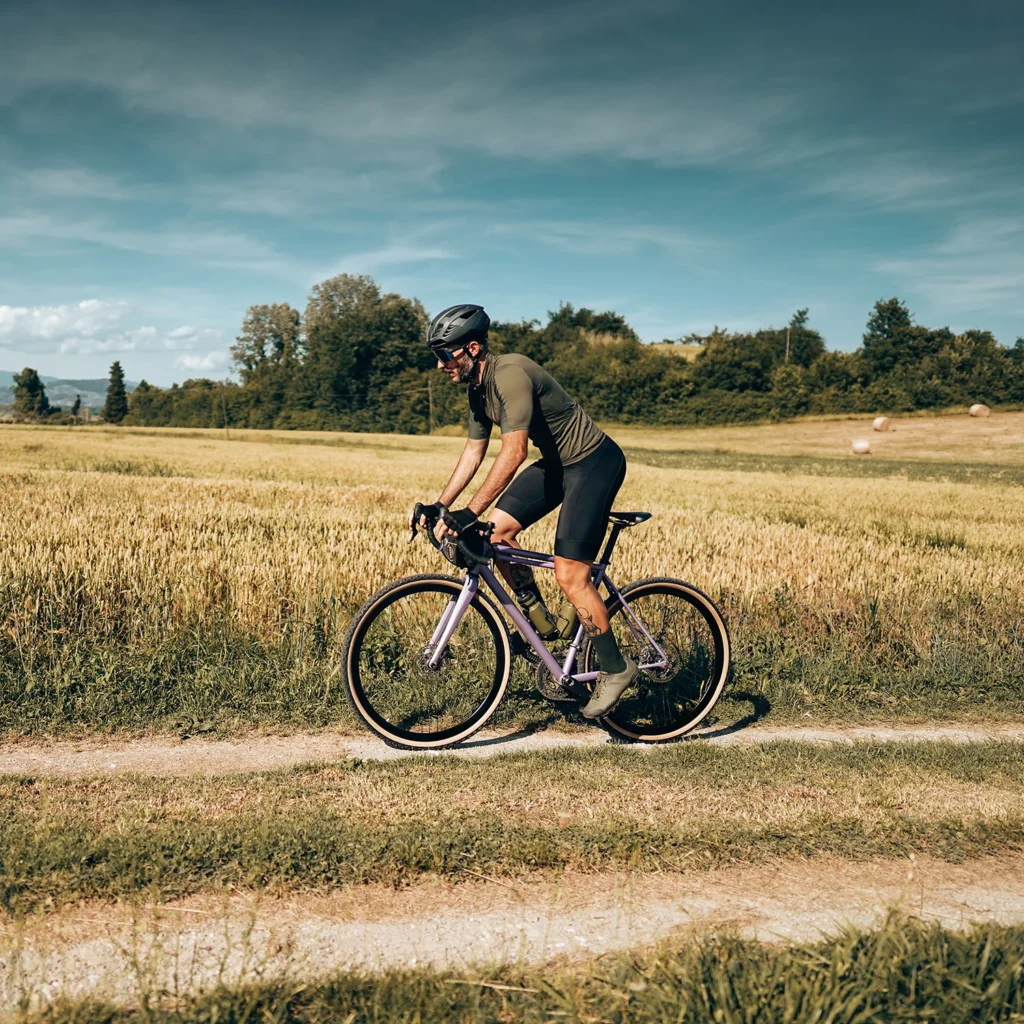
Versatility of Terrain:
Gravel bikes are incredibly versatile, and designed to handle a wide range of terrains. From smooth gravel roads to rugged trails, muddy paths, and even pavement, these bikes adapt to various surfaces, making every ride an adventure.
Gravel riding allows you to seamlessly transition between different types of terrain, keeping your rides exciting and unpredictable.
Closer to Nature:
Riding gravel often takes you into more remote and natural settings. Whether you’re exploring countryside lanes, forest trails, or open meadows, gravel riding provides a sense of closeness to nature that’s hard to replicate on urban roads.
It’s an opportunity to escape the hustle and bustle, breathe in fresh air, and connect with the outdoors.
Sense of Freedom:
Gravel riding embodies a sense of freedom. There are fewer traffic lights, congestion, and urban noise. The open road or trail ahead is your canvas, and you have the freedom to choose your path.
It’s a liberating experience that allows you to ride at your own pace and follow your curiosity.
Adventure Mindset:
Gravel riders often adopt an adventure mindset. It’s not just about the destination; it’s about the journey. You might encounter challenging climbs, river crossings, or unexpected detours, all of which contribute to the sense of adventure.
Overcoming these obstacles becomes part of the thrill.
Social Connection:
Gravel riding can be a shared experience. Many gravel events and rides bring together cyclists from diverse backgrounds, fostering a sense of community and camaraderie. Riding with others adds to the enjoyment and can lead to lasting friendships.
Bike Customization:
Gravel riders often customize their bikes to suit their preferences and the terrain they frequent. From tire choice to gear ratios, handlebar setups, and frame bags for carrying essentials, customization adds a personal touch to each bike, enhancing the riding experience.
Physical and Mental Challenge:
Gravel riding offers a combination of physical and mental challenges. Navigating varied terrain, conquering steep climbs, and enduring long distances require both physical fitness and mental resilience. Overcoming these challenges brings a deep sense of accomplishment.
Unpredictability and Surprises:
One of the joys of gravel riding is embracing the unpredictability of the journey. You may stumble upon hidden lakes, encounter wildlife, or witness breathtaking vistas you wouldn’t have discovered otherwise. The element of surprise keeps each ride exciting.
All-Season Riding:
Gravel riding isn’t limited to fair weather. Many gravel enthusiasts ride year-round, embracing the changing seasons and riding conditions. Riding through snow, rain, or under a canopy of autumn leaves adds variety and a sense of resilience to the experience.
“The Joy of Gravel Riding” is about embracing the unknown, seeking adventure, and savoring the thrill of exploration on two wheels.
It’s a celebration of the freedom, versatility, and connection with nature that gravel riding offers, making it a truly unique and fulfilling cycling
Conclusion
In conclusion, building a gravel bike is a rewarding journey that allows you to create a two-wheeled adventure companion tailored to your preferences.
Throughout this process, you’ve learned how to select the right components, fine-tune your bike for optimal performance, and embrace the joy of gravel riding.
Building a gravel bike isn’t just about assembling parts; it’s about crafting an experience—a passport to explore new horizons, connect with nature, and find freedom on the open road.
Now that you know how to build a gravel bike, the world of gravel riding is yours to explore, and the possibilities are limitless. So, get ready to pedal off the beaten path and discover the unparalleled joy of gravel riding.
FAQ’s
How to build a gravel bike?
Building a gravel bike involves selecting components like frame, wheels, and tires, assembly, and tuning. Customize for terrain, enjoy versatility, and embrace adventure on diverse roads and trails.
How do you turn a bike into a gravel bike?
Transforming a bike into a gravel bike involves upgrading tires to wider, knobbier ones, ensuring clearance, installing drop bars, and optimizing gear ratios for varied terrain, enhancing off-road capability and comfort.
Can I turn a road bike into a gravel bike?
Yes, you can convert a road bike into a gravel bike. Key steps include switching to wider, treaded tires, adjusting the gearing, and adding components for improved off-road performance and comfort.
What material is used for gravel bikes?
Gravel bikes are commonly made from materials like aluminum, steel, titanium, or carbon fiber. Each material offers different characteristics in terms of weight, comfort, and durability.
Is 35mm wide enough for gravel?
A 35mm tire width can handle many gravel surfaces, but tire choice depends on terrain and rider preference. Wider tires, often 40mm or more, provide better traction and comfort on rougher gravel.

Welcome to Bikegenics, where passion meets performance! We are a leading online destination for all things related to mountain biking, dedicated to providing you with top-notch gear, expert advice, and an immersive community to fuel your two-wheeled adventures. With a commitment to excellence and a deep love for the sport, we strive to elevate your biking experience to new heights.